Forget “vintage” or “recycled” – today’s buzzword is “up-cycling”. It’s a word that covers everything from the classic stripping and re-painting an old chest of drawers, to even transforming disused traffic lights into a desk lamp—an idea we simply love here at Roost, and one that has inspired us to pick a few of our favourite environmentally friendly finds. Plus, we’re also sharing a few tips on how to easily start (and finish!) your very own up-cycled project. 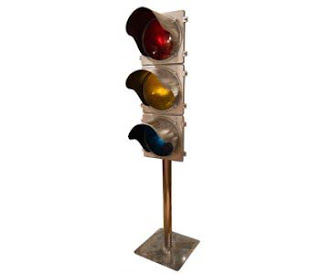
Ready, steady, go!
This trio of colourful signals (from Chiswick’s The Old Cinema) makes for a desk lamp with a difference.

Ruling the Roost
We love our best selling shade as it’s just so unique – made of vintage rulers, it creates such a talking-point piece.

Bright idea
BootsNGus reincarnate commonly found glass jars into eco friendly yet modern chandeliers.
Feeling creative? Give up-cycling your own lampshade a go. Here’s how:
1. Use an old lampshade that you’re happy to reinvent or pick one up from a charity shop. Top tip: we recommend using one that has a wire frame with easy to remove fabric.
2. Make a new pattern for the frame by removing the old fabric and placing it seam down on a piece of brown paper.
3. Place a pencil on the top edge of the lampshade and onto the paper. Keep the pencil in place and roll the lampshade, drawing a line around the edge. Make sure you keep the pencil to the paper the whole way round
4. Repeat this process by laying the lampshade back down where you started drawing the first line and continue until you have made a complete circle.
5. Cut out the pattern and trace it onto your new material and cut the fabric to the pattern.
6. Cover the reverse side of the fabric with a spray-on adhesive and carefully position the fabric, starting at the seam, around the lampshade.
7. Trim any excess fabric from the top and bottom of the lampshade (or hand-stitch for a neater finish).
8. Time for the piece de résistance! Raid your spare button tin (or buy some odd ones from a haberdashery) and sew them on, covering the entire shade. Et voila!
P.S. Too much like hard work? Fast track to a unique up-cycled shade by adorning an old one with plenty of cute buttons.

 To see Kathy’s masterpieces in-the-making, take a look at her blog, where you’ll also discover the full story behind Ms Chattanooga and how she was made, as well as the inspiration behind Kathy's pieces.


